Day 42: Project — Building a Simple To-Do List Application with Django
Creating a Django-Based To-Do List App — A Step-by-Step Guide for Beginners
Author: Harshil Chovatiya
Introduction
Welcome to Day 42 of our Python and Django learning journey!
Today, we’re diving into a practical project where we’ll build a simple To-Do List application using Django. This project will consolidate your knowledge from previous days and provide hands-on experience in creating a functional web application.
In this blog, we’ll cover:
Project Overview
- Defining the Project
- Setting Up the Environment
Building the To-Do List Application
- Designing the Application
- Implementing Models
- Creating Views
- Setting Up URLs
- Building Templates
Testing and Debugging
- Running the Development Server
- Testing the Application
- Debugging Common Issues

Part 1: Project Overview
Defining the Project
For this project, we’ll build a simple To-Do List application. This application will allow users to create, view, and manage their tasks. The features will include:
- Viewing a list of tasks
- Adding new tasks
- Marking tasks as complete
- Deleting tasks
This project will help you understand how to integrate models, views, and templates into a cohesive Django application.
Setting Up the Environment
- Install Django:
If you haven’t already installed Django, you can do so using pip:
pip install django2. Create a Django Project:
Start by creating a new Django project using the following command:
django-admin startproject todolistNavigate into your project directory:
cd todolist3. Create a Django App:
Inside your project, create a new app called tasks:
python manage.py startapp tasks4. Add the App to Settings:
Open todolist/settings.py and add 'tasks' to the INSTALLED_APPS list.
INSTALLED_APPS = [ # other apps 'tasks', ]Part 2: Building the To-Do List Application
Designing the Application
Before diving into coding, it’s important to design your application. For our To-Do List application, we’ll need the following components:
- Model: Represents tasks.
- Views: Handles the logic for displaying and processing data.
- Templates: Defines the HTML structure and presentation of our tasks.
Implementing Models
Models define the structure of our data and interact with the database. For our To-Do List application, we’ll create a Task model to represent tasks.
Create the Task Model:
Open tasks/models.py and define the Task model:
# tasks/models.py
from django.db import models
class Task(models.Model):
    title = models.CharField(max_length=200)
    completed = models.BooleanField(default=False)
    created_at = models.DateTimeField(auto_now_add=True)
    def __str__(self):
        return self.title
Explanation:
title: ACharFieldfor the task title.completed: ABooleanFieldto indicate whether the task is completed.created_at: ADateTimeFieldthat automatically sets the creation timestamp.
After defining the model, create and apply migrations:
python manage.py makemigrations
python manage.py migrate
Creating Views
Views handle the business logic and interaction between the user and the data. We’ll create views for listing tasks, adding new tasks, marking tasks as complete, and deleting tasks.
Create Views for Task Operations:
Open tasks/views.py and add the following views:
# tasks/views.py
from django.shortcuts import render, get_object_or_404, redirect
from .models import Task
def task_list(request):
    tasks = Task.objects.all()
    return render(request, 'tasks/task_list.html', {'tasks': tasks})
def task_create(request):
    if request.method == 'POST':
        title = request.POST.get('title')
        if title:
            Task.objects.create(title=title)
        return redirect('task_list')
    return render(request, 'tasks/task_form.html')
def task_complete(request, pk):
    task = get_object_or_404(Task, pk=pk)
    task.completed = True
    task.save()
    return redirect('task_list')
def task_delete(request, pk):
    task = get_object_or_404(Task, pk=pk)
    if request.method == 'POST':
        task.delete()
        return redirect('task_list')
    return render(request, 'tasks/task_confirm_delete.html', {'task': task})
Explanation:
task_list: Displays a list of all tasks.task_create: Provides a form to create a new task.task_complete: Marks a task as completed.task_delete: Deletes a task after confirmation.

Setting Up URLs
URLs route user requests to the appropriate views. Define URL patterns for the tasks application.
Configure URLs:
Create a urls.py file in the tasks directory and add the following code:
# tasks/urls.py
from django.urls import path
from . import views
urlpatterns = [
    path('', views.task_list, name='task_list'),
    path('new/', views.task_create, name='task_create'),
    path('complete/<int:pk>/', views.task_complete, name='task_complete'),
    path('delete/<int:pk>/', views.task_delete, name='task_delete'),
]
Include these URLs in the project’s urls.py file:
# todolist/urls.py
from django.contrib import admin
from django.urls import path, include
urlpatterns = [
    path('admin/', admin.site.urls),
    path('', include('tasks.urls')),
]
Building Templates
Templates define how your data is presented to users. Create templates for each view.
Create Templates:
- Task List Template:
Create task_list.html in the tasks/templates/tasks directory:
<!DOCTYPE html>
<html>
<head>
    <title>To-Do List</title>
    {% load static %}
    <link rel="stylesheet" type="text/css" href="{% static 'tasks/styles.css' %}">
</head>
<body>
    <h1>To-Do List</h1>
    <a href="{% url 'task_create' %}">Add New Task</a>
    <ul>
        {% for task in tasks %}
            <li>
                {% if task.completed %}
                    <strike>{{ task.title }}</strike>
                {% else %}
                    {{ task.title }}
                    <a href="{% url 'task_complete' pk=task.pk %}">Mark as Complete</a>
                {% endif %}
                <a href="{% url 'task_delete' pk=task.pk %}">Delete</a>
            </li>
        {% endfor %}
    </ul>
</body>
</html>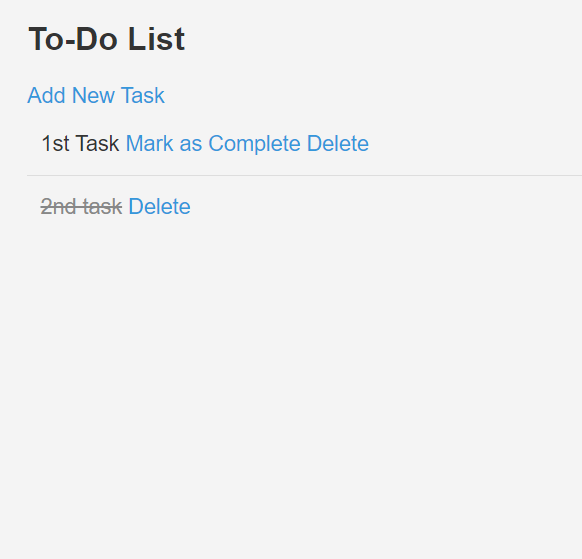
2.Task Form Template:
Create task_form.html:
<!DOCTYPE html>
<html>
<head>
    <title>Add New Task</title>
    {% load static %}
    <link rel="stylesheet" type="text/css" href="{% static 'tasks/styles.css' %}">
</head>
<body>
    <h1>Add New Task</h1>
    <form method="post">
        {% csrf_token %}
        <input type="text" name="title" placeholder="Task Title">
        <button type="submit">Add Task</button>
    </form>
    <a href="{% url 'task_list' %}">Back to List</a>
</body>
</html>
3. Task Confirm Delete Template:
Create task_confirm_delete.html:
<!-- tasks/templates/tasks/task_confirm_delete.html -->
<!DOCTYPE html>
<html>
<head>
    <title>Confirm Delete</title>
    {% load static %}
    <link rel="stylesheet" type="text/css" href="{% static 'tasks/styles.css' %}">
</head>
<body>
    <h1>Are you sure you want to delete "{{ task.title }}"?</h1>
    <form method="post">
        {% csrf_token %}
        <button type="submit">Confirm Delete</button>
    </form>
    <a href="{% url 'task_list' %}">Cancel</a>
</body>
</html>
Part 3: Testing and Debugging
Running the Development Server
To see your application in action, run the development server:
python manage.py runserverVisit http://127.0.0.1:8000/ in your web browser to interact with your To-Do List application.

Testing the Application
Test all functionalities of your To-Do List application:
- Viewing Tasks: Ensure you can see the list of tasks.
- Adding Tasks: Verify that you can add a new task and see it listed.
- Marking Tasks as Complete: Check that you can mark tasks as complete.
- Deleting Tasks: Confirm that tasks can be deleted and that the list updates accordingly.
Debugging Common Issues
- Template Not Found: Ensure your templates are placed in the correct directory structure, i.e.,
tasks/templates/tasks/. - URL Routing Issues: Double-check your
urls.pyfiles to make sure paths are correctly defined and that they match the view functions. - Form Not Submitting: If your form is not submitting, ensure you have the
csrf_tokenincluded in your form templates and that yourviews.pyhandles POST requests properly. - Database Errors: If you encounter issues with the database, ensure that migrations have been applied correctly and that your models are properly defined.
- Page Not Loading: If a page is not loading, check the console for any error messages, and verify that your development server is running.
Conclusion
In this project, you built a simple but functional To-Do List application using Django. This project helped you practice working with models, views, templates, and URLs, as well as handling common operations like creating, updating, and deleting data.
Building projects like this is a great way to solidify your understanding of Django and web development concepts. As you continue learning, consider adding more features to this project, such as user authentication, filtering tasks, or deploying the application to a web server.
Stay tuned!


![Django Interview Questions [Part 2]](https://miro.medium.com/v2/resize:fit:679/1*lDTTLpzn9I5ukYgH2rCb4A.png)
